
[vc_row padding_top=”0px” padding_bottom=”0px”][vc_column fade_animation_offset=”45px” width=”1/1″][text_output]If you’re like me and on a budget, here is an affordable way to make your own paper lantern!
What you need:
- Colored construction paper or cardstock
- Pencil
- Eraser
- A Thumbtack
- Scissors (if you want to cut any extra paper off)
- Glue or double sided tape
Optional: A stencil or template [/text_output][/vc_column][/vc_row][vc_row padding_top=”0px” padding_bottom=”0px”][vc_column fade_animation_offset=”45px” width=”1/1″][text_output]
STEP 1: Pick your color!
I used construction paper, just because I had some laying around the house. I chose red, of course for the symbol of luck and prosperity – bring it on![/text_output][/vc_column][/vc_row][vc_row padding_top=”0px” padding_bottom=”0px”][vc_column fade_animation_offset=”45px” width=”1/1″][text_output]
STEP 2: Become an artist!
Lightly sketch a design on the front of your paper. This was my attempt at a lotus flower – *pats myself on the back*
TIP: Use a simple design[/text_output][/vc_column][/vc_row][vc_row padding_top=”0px” padding_bottom=”0px” bg_color=”#e8b500″ bg_video=”” class=”” style=””][vc_column fade_animation_offset=”45px” width=”1/3″][gap size=”1.313em” id=”” class=”” style=””][/vc_column][vc_column fade_animation_offset=”45px” width=”1/3″][gap size=”1.313em” id=”” class=”” style=””][image src=”638″ alt=”” href=”” title=”” info_content=”” lightbox_caption=”” id=”” class=”” style=””][/vc_column][vc_column fade_animation_offset=”45px” width=”1/3″][gap size=”1.313em” id=”” class=”” style=””][/vc_column][/vc_row][vc_row padding_top=”0px” padding_bottom=”0px”][vc_column fade_animation_offset=”45px” width=”1/1″][text_output]
STEP 3: Punch!
Once your sketch is complete, use the thumbtack to punch holes through the outline. Be careful to space the holes out so they do not overlap.
TIP: Place a piece of styrofoam behind the paper[/text_output][/vc_column][/vc_row][vc_row padding_top=”0px” padding_bottom=”0px” bg_color=”#e8b500″ bg_video=”” class=”” style=””][vc_column fade_animation_offset=”45px” width=”1/3″][gap size=”1.313em” id=”” class=”” style=””][/vc_column][vc_column fade_animation_offset=”45px” width=”1/3″][gap size=”1.313em” id=”” class=”” style=””][image src=”641″ alt=”” href=”” title=”” info_content=”” lightbox_caption=”” id=”” class=”” style=””][/vc_column][vc_column fade_animation_offset=”45px” width=”1/3″][gap size=”1.313em” id=”” class=”” style=””][/vc_column][/vc_row][vc_row padding_top=”0px” padding_bottom=”0px”][vc_column fade_animation_offset=”45px” width=”1/1″][text_output]
STEP 4: Erase!
Great job! See that really didn’t take too long. Now lightly erase any pencil lines still showing. Be careful not to bear down too hard, the holes may close a little.[/text_output][/vc_column][/vc_row][vc_row padding_top=”0px” padding_bottom=”0px” bg_color=”#e8b500″ bg_video=”” class=”” style=””][vc_column fade_animation_offset=”45px” width=”1/3″][gap size=”1.313em” id=”” class=”” style=””][/vc_column][vc_column fade_animation_offset=”45px” width=”1/3″][gap size=”1.313em” id=”” class=”” style=””][image src=”637″ alt=”” href=”” title=”” info_content=”” lightbox_caption=”” id=”” class=”” style=””][/vc_column][vc_column fade_animation_offset=”45px” width=”1/3″][gap size=”1.313em” id=”” class=”” style=””][/vc_column][/vc_row][vc_row padding_top=”0px” padding_bottom=”0px”][vc_column fade_animation_offset=”45px” width=”1/1″][text_output]
STEP 5: Cut and stick!
Get creative! You can cut the lanterns into different sizes, I left mine tall in order to cover my tall candle. Once you have decided on a height, place glue or double sided tape on the two ends and fold together, creating a circle. I used a large candle to help curve the paper.
TIP: I applied way to much glue – double sided tape next time. [/text_output][/vc_column][/vc_row][vc_row padding_top=”0px” padding_bottom=”0px” bg_color=”#e8b500″ bg_video=”” class=”” style=””][vc_column fade_animation_offset=”45px” width=”1/3″][gap size=”1.313em” id=”” class=”” style=””][/vc_column][vc_column fade_animation_offset=”45px” width=”1/3″][gap size=”1.313em” id=”” class=”” style=””][image src=”640″ alt=”” href=”” title=”” info_content=”” lightbox_caption=”” id=”” class=”” style=””][/vc_column][vc_column fade_animation_offset=”45px” width=”1/3″][gap size=”1.313em” id=”” class=”” style=””][/vc_column][/vc_row][vc_row padding_top=”0px” padding_bottom=”0px”][vc_column fade_animation_offset=”45px” width=”1/1″][text_output]
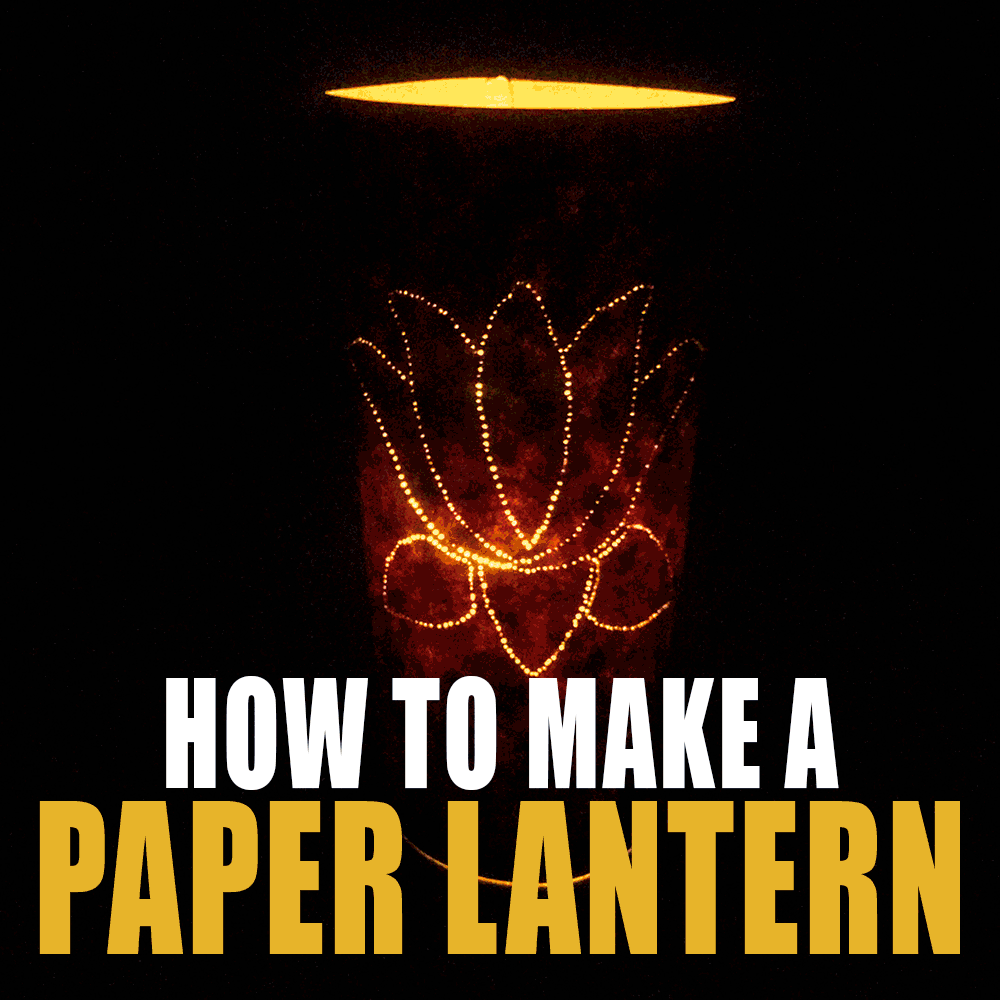
STEP 6: Light it up!
Place in a dark room and watch it shine! I placed a scented flameless candle inside of mine. Two in one – a beautiful light and wonderful vanilla scent! Yay!![/text_output][/vc_column][/vc_row][vc_row padding_top=”0px” padding_bottom=”0px” bg_color=”#e8b500″ bg_video=”” class=”” style=””][vc_column fade_animation_offset=”45px” width=”1/3″][gap size=”1.313em” id=”” class=”” style=””][/vc_column][vc_column fade_animation_offset=”45px” width=”1/3″][gap size=”1.313em” id=”” class=”” style=””][image src=”639″ alt=”” href=”” title=”” info_content=”” lightbox_caption=”” id=”” class=”” style=””][/vc_column][vc_column fade_animation_offset=”45px” width=”1/3″][gap size=”1.313em” id=”” class=”” style=””][/vc_column][/vc_row][vc_row padding_top=”0px” padding_bottom=”0px”][vc_column fade_animation_offset=”45px” width=”1/1″][text_output]
WARNING: These are flammable and could pose a fire hazard if used with a burning flame. Our recommendation is to use a flameless candle.
[/text_output][text_output]
Show us your work! #traveljunkiespodcast
[/text_output][/vc_column][/vc_row][vc_row padding_top=”0px” padding_bottom=”0px”][vc_column fade_animation_offset=”45px” width=”1/1″][text_output] [/text_output][/vc_column][/vc_row]